[MS] Which Azure Cosmos DB Role Does My App Need? - devamazonaws.blogspot.com
In the previous post in the series, we covered the security decisions you make on day one. In this part, we will talk about how to give your app access to Cosmos DB data, using roles and a managed identity instead of keys.
Most apps that write data want Data Contributor. A read-only reporting service or a cache-warming job wants Data Reader. Start with the narrowest role that still lets your app do its job. You can always widen it later, and your future self-doing a security review will thank you.
If neither built-in role fits (for example, you want to write but not delete), you can define a custom role. That is a more advanced topic. For now, the built-ins are almost certainly what you want.
Post Updated on June 25, 2026 at 02:00PM
Thanks for reading
from devamazonaws.blogspot.com
The situation
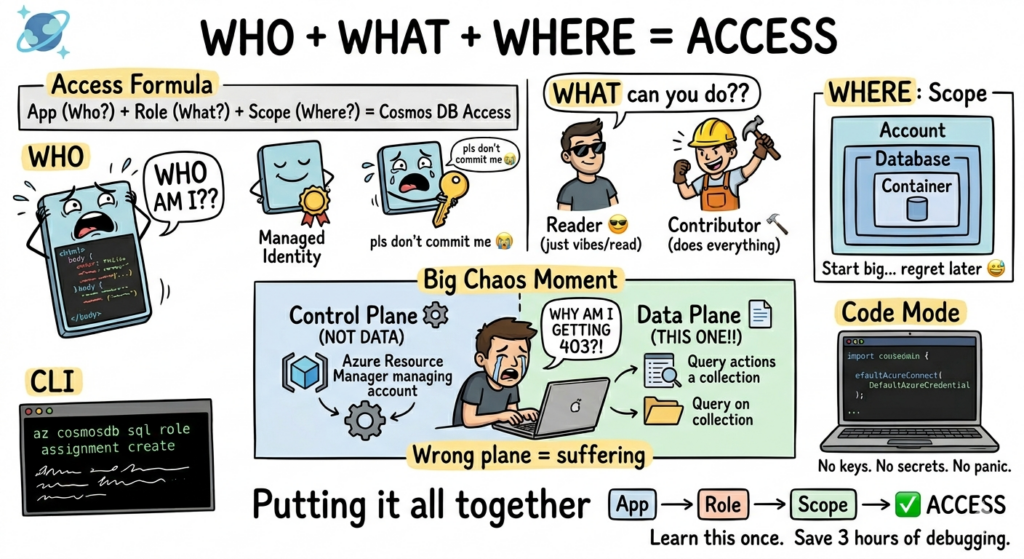
You’ve built your app. It works locally. Now you’re ready to connect it to Azure Cosmos DB, and you hit the question: how does my app get access? There are really only three questions you need to answer:- Who is asking for access? (your app's identity)
- What are they allowed to do? (a role)
- Where does that permission apply? (a scope)

First, the one distinction that trips everyone up
Cosmos DB has two completely separate permission systems. If you remember nothing else from this post, remember this:| Control Plane | Data Plane | |
| What it governs | Managing the account: create/delete databases and containers, change throughput, read keys, configure networking | Reading and writing the actual data: documents, queries, stored procedures |
| Where roles live | Azure RBAC (the same Microsoft.Authorizationroles you use everywhere in Azure) |
Cosmos DB's own data plane RBAC (separate role definitions) |
| Example role | "Cosmos DB Account Reader" "Contributor" | "Cosmos DB Built-in Data Reader," "Cosmos DB Built-in Data Contributor" |
The three pieces
1. Who: your app's identity (use a managed identity)
Your app needs an identity that Azure recognizes. You have two real options:- Managed identity (recommended): Azure manages the credentials for you. No secrets, no rotation, nothing in your config files. If your app runs on App Service, Functions, Container Apps, AKS, or a VM, use this.
- Service principal: a manually registered app identity with a client secret or certificate. Use this only when a managed identity is not available (for example, code running outside Azure).
az webapp identity assign \
--name my-app \
--resource-group my-rgprincipalId. Hold onto it. That is the "who" in your role assignment.
2. What: a built-in data role
You do not need to invent roles. Cosmos DB ships two built-in data plane roles that cover almost every app:| Role | ID | Capabilities |
| Cosmos DB Built-in Data Reader | 00000000-0000-0000-0000-000000000001 |
Read documents, run queries, read change feed |
| Cosmos DB Built-in Data Contributor | 00000000-0000-0000-0000-000000000002 |
Everything the reader can do, plus create, replace, upsert and delete documents |
3. Where: the scope
A role assignment applies to a scope. For data plane roles, the scope is a path inside your account:- Whole account (
/): The role applies to every database and container. Simple, and fine for most single-app accounts. - A specific database or container: The role applies only to that path. Use this when different apps share an account and should be isolated.
Putting it together
# Variables
ACCOUNT="my-cosmos-account"
RESOURCE_GROUP="my-rg"
PRINCIPAL_ID="<the principalId from your managed identity>"

# The built-in Data Contributor role
ROLE_ID="00000000-0000-0000-0000-000000000002"

# Scope to the whole account
SCOPE="/"

az cosmosdb sql role assignment create \
--account-name "$ACCOUNT" \
--resource-group "$RESOURCE_GROUP" \
--role-definition-id "$ROLE_ID" \
--principal-id "$PRINCIPAL_ID" \
--scope "$SCOPE"cosmosdb sql role assignment, which is the data plane RBAC surface, distinct from az role assignment create(which is Azure control plane RBAC). Easy to confuse, very different effects.
[alert type="tip" heading="Tip"] Want to see what roles you already have? Use the below to see every data plane assignment on the account
az cosmosdb sql role assignment list
--account-name "$ACCOUNT"
--resource-group "$RESOURCE_GROUP"
[/alert]
Now wire it into your app
With the role assigned, your code authenticates with the managed identity instead of a key. The SDK does the token work for you throughDefaultAzureCredential, which automatically picks up the managed identity in Azure and your developer sign-in locally.
using Azure.Identity;
using Microsoft.Azure.Cosmos;

var client = new CosmosClient(
   accountEndpoint: "https://my-cosmos-account.documents.azure.com:443/",
tokenCredential: new DefaultAzureCredential());DefaultAzureCredentialinstead of a key. Notice what is missing here: there is no key, no connection string, no secret. The endpoint is not sensitive. The identity and the role assignment do all the work.
That is really all there is to it: three answers, one role assignment, and not a single secret to manage. Once those three questions feel natural, the harder stuff gets a lot less intimidating, whether you are sharing access with your team or tightening things down for production.
Try it yourself
The best way to make this stick is to do it once, end to end:
- Turn on a managed identity for an app you already have running in Azure (App Service, Functions, or Container Apps).
- Assign the Built-in Data Reader role scoped to your account, using the commands above.
- Swap your key for
DefaultAzureCredentialin your code and confirm reads still work. - Delete the key or connection string from your config and watch your app keep running. That deletion is the whole point.
About Azure Cosmos DB
Azure Cosmos DB is a fully managed and serverless NoSQL and vector database for modern app development, including AI applications. With its SLA-backed speed and availability as well as instant dynamic scalability, it is ideal for real-time NoSQL and MongoDB applications that require high performance and distributed computing over massive volumes of NoSQL and vector data.
To stay in the loop on Azure Cosmos DB updates, follow us on X, YouTube, and LinkedIn. Join the discussion with other developers on the #nosql channel on the Microsoft Open Source Discord.
Post Updated on June 25, 2026 at 02:00PM
Thanks for reading
from devamazonaws.blogspot.com

Comments
Post a Comment